


3 Way Switch Wiring Diagram: Master Your Lighting!

Are you looking to understand how a 3-way switch works? You’re in the right place! This simple guide will walk you through the basics of 3-way switch wiring. Even if you’re a beginner, you’ll find this information easy to grasp. Let’s dive in!
What is a 3-Way Switch?
A 3-way switch allows you to control a single light from two different locations. This is very handy in rooms with two entries or long hallways. You can turn the light on or off from either end. Isn’t that convenient?
Understanding the Basics
Before we look at the wiring diagram, let’s understand some key components:
- Switch: This is what you press to turn the light on or off.
- Light: The fixture that lights up when you flip the switch.
- Wire: Cables that connect everything together.
With these components in mind, let’s move on to the wiring part.
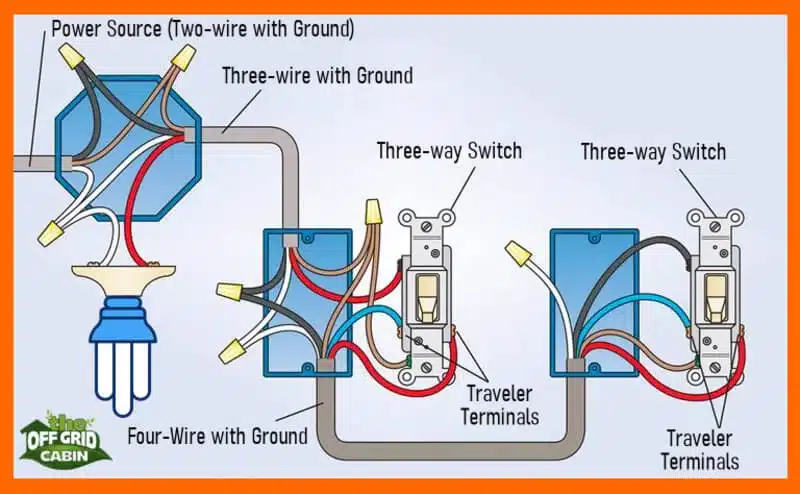
3 Way Switch Wiring Diagram Explained
Imagine two switches at two different ends of a room. These are your 3-way switches. They work together to control the light.
| Step | Action |
|---|---|
| 1 | Turn off the power to the circuit. |
| 2 | Connect the first switch to the power source. |
| 3 | Use wires to connect the two switches. |
| 4 | Connect the second switch to the light. |
| 5 | Turn the power back on and test your work. |
Remember, safety first! Always make sure the power is off before you start.
Why Use a 3-Way Switch?
3-way switches are super useful. They make life easier in many situations. Here are a few reasons why:
- You can control a light from two places. This is great for stairs or long hallways.
- They add convenience. No need to walk back to the other end to turn off the light.
- They can make your home safer. You can easily light up a path before you walk.
Common Questions Answered
Can I Install A 3-way Switch By Myself?
Yes, you can! With the right tools and this guide, you can do it. Just be sure to turn off the power first.
Do I Need Special Wires?
Not really. Standard electrical wires are fine. But, make sure they are the right type for your home.
What If It Doesn’t Work?
Check your connections again. Make sure all wires are securely attached. If you’re not sure, it’s best to ask for help from an adult or a professional.
Tips for Success
- Always double-check that the power is off before starting.
- Use a tester to make sure there’s no power in the wires.
- Follow the wiring diagram carefully.
- If you’re not sure, ask for help. It’s better to be safe!
Frequently Asked Questions
What Is A 3-way Switch Wiring?
A 3-way switch allows for controlling a single light from two different locations. This configuration is commonly used in hallways and staircases for convenience and safety.
How Do You Wire A 3-way Switch?
To wire a 3-way switch, connect the power source to the first switch’s common terminal, link the two switches with traveler wires, and connect the light fixture to the second switch’s common terminal.
What Tools Do I Need For 3-way Switch Wiring?
You will need a screwdriver, wire stripper, voltage tester, and wire nuts for 3-way switch wiring. Ensure the power is off before starting any electrical work.
Can I Diy 3-way Switch Installation?
Yes, with proper guidance and adherence to safety protocols, a DIY enthusiast can install a 3-way switch. However, consulting a professional is recommended if unsure.
Conclusion
Now you know how a 3-way switch works and how to wire it. With this guide, you’re ready to tackle this project. Remember, safety is the most important thing. Take your time and double-check everything. Happy wiring!